Homestead skills
Pressure Canning Low-Acid Food
Green beans, corn, dry beans, meat and soup only keep on a shelf when they are processed under pressure. Here is the tested method, step by step.
To pressure can low-acid food safely, use a real pressure canner that holds at least four quart jars, follow a tested recipe for that exact food and jar size, vent the canner with steam for a full 10 minutes, and hold the pressure your altitude requires through the whole processing time. Then let the canner cool on its own before you open it.
Those steps come from the USDA's canning guide as the National Center for Home Food Preservation publishes it, and every one of them exists for the same reason: botulism. Get them right and a shelf of home-canned beans, corn and venison will feed a household through a hard winter without a freezer or a watt of power.
Why low-acid food needs pressure
The bacterium behind botulism, Clostridium botulinum, lives in soil and water everywhere. Clemson Cooperative Extension explains that its spores are harmless on their own and survive both cooking and a boiling-water bath. Seal them in a jar of low-acid food, with the oxygen driven out, and keep that jar anywhere between 40 and 120 degrees, and the spores wake up, grow and make a nerve toxin strong enough to kill.
Acid stops them. Fruit, jams and pickles are acidic enough to be safe after a boiling-water bath at 212 degrees. Vegetables, dry beans, meat, poultry, fish and soups are not. For those, the water in the canner has to be pushed past its normal boiling point, and the only way a home kitchen gets there is by trapping steam under pressure. Clemson puts the target at 240 degrees, and Illinois Extension gives 240 to 250 for low-acid food. The tested times are built on holding it there long enough for the heat to reach the center of every jar.
This is not a theoretical risk. A CDC review of botulism outbreaks from 1990 to 2000 found home-canned vegetables behind 44 percent of the foodborne events in the lower 48 states and Hawaii. The jars that cause them usually look fine. A sealed lid tells you the jar is airtight. It says nothing about whether the food inside was heated enough. That is why tomatoes sit in a gray zone of their own: tested recipes add lemon juice or citric acid to bring them into water-bath range, or process them under pressure.
What counts as a pressure canner
The USDA's published processes assume a canner big enough to hold at least four quart jars standing upright. Smaller pots heat up and cool down faster, and that difference matters, because the heating and cooling time is counted as part of the process that kills spores. NCHFP also says to buy a canner with Underwriters Laboratories approval.
Electric multicookers, Instant Pots included, are not canners for this purpose. Illinois Extension lists canning in an electric pressure cooker among the unsafe methods, and the tested low-acid times were never worked out in them. A stovetop pressure saucepan for dinner is out for the same reason.
Canners come with one of two ways to show pressure, and the recipe tables change with each:
- A weighted gauge is a weight that sits on the vent pipe and jiggles or rocks when the canner holds its set pressure. It reads only 5, 10 or 15 pounds, so at altitude you jump straight to the next weight. It needs no yearly test.
- A dial gauge shows the pressure on a needle and lets you hit finer steps, like 11 or 12 pounds. The weight on a dial-gauge canner only closes the vent and does not regulate anything, so you read the dial and nothing else. The dial has to be tested every year.
Check your stove before you buy. NCHFP warns that a burner putting out too much heat can damage a canner, and in general advises against outdoor LP burners and gas burners over 12,000 BTU. The range also has to be level. If you plan to can on wood heat, our guide to cooking on a wood stove covers how hard it is to hold a steady pressure there.
Before the first batch
Most failures start before the jars go in. Go over the canner the day before you plan to use it.
Get the dial gauge tested. NCHFP's rule is a test every year before use: a gauge that reads more than two pounds high or low at 5, 10 or 15 pounds gets replaced, and one that is closer than that can be allowed for. Many county extension offices test gauges, often free. North Carolina State Extension adds that a gauge should also be tested after any knock or fall.
Look at the gasket for cracks and stiffness, and make sure the steam vent is clear. Hold the lid up to the light. Mineral crust or a bit of last year's bean skin in the vent changes how the canner behaves. Clemson's checklist also covers the overpressure plug and any vent holes.
Then pick the recipe. Clemson's advice is blunt: do not use a recipe from your mother, your grandmother, a friend, a neighbor or the internet unless you know it came unchanged from a reliable source, and it names the NCHFP, the USDA, Cooperative Extension, So Easy to Preserve and freshpreserving.com among the reliable ones. Some foods have no tested home process at all. Clemson lists pumpkin puree, pumpkin butter, sweet potato puree and yellow summer squash. Can pumpkin in cubes, which has a process, and mash it when you open the jar.
Use standard canning jars, new flat lids and clean bands. If you are new to this, start with something forgiving like green beans or carrots rather than meat, so you learn the canner before the stakes and the price of a mistake go up.
How to pressure can vegetables, step by step
This is the sequence from NCHFP's instructions, which apply to every low-acid food. The recipe for your food adds how to prepare it, how to pack it, the headspace, the time and the pressure.
- Put the rack and water in the canner. Unless your food's directions call for more, the water should stand 2 to 3 inches deep. Heat it to about 140 degrees for raw-packed jars or 180 degrees for hot-packed ones, without letting it boil down.
- Pack and close the jars. Fill them as the recipe says, leave the stated headspace, wipe the rims, and fit the lids and bands. Load them onto the rack upright with a jar lifter. A tilted jar can push food into the sealing edge.
- Lock the lid with the vent open. Leave the weight off the vent pipe, or open the petcock on an older canner.
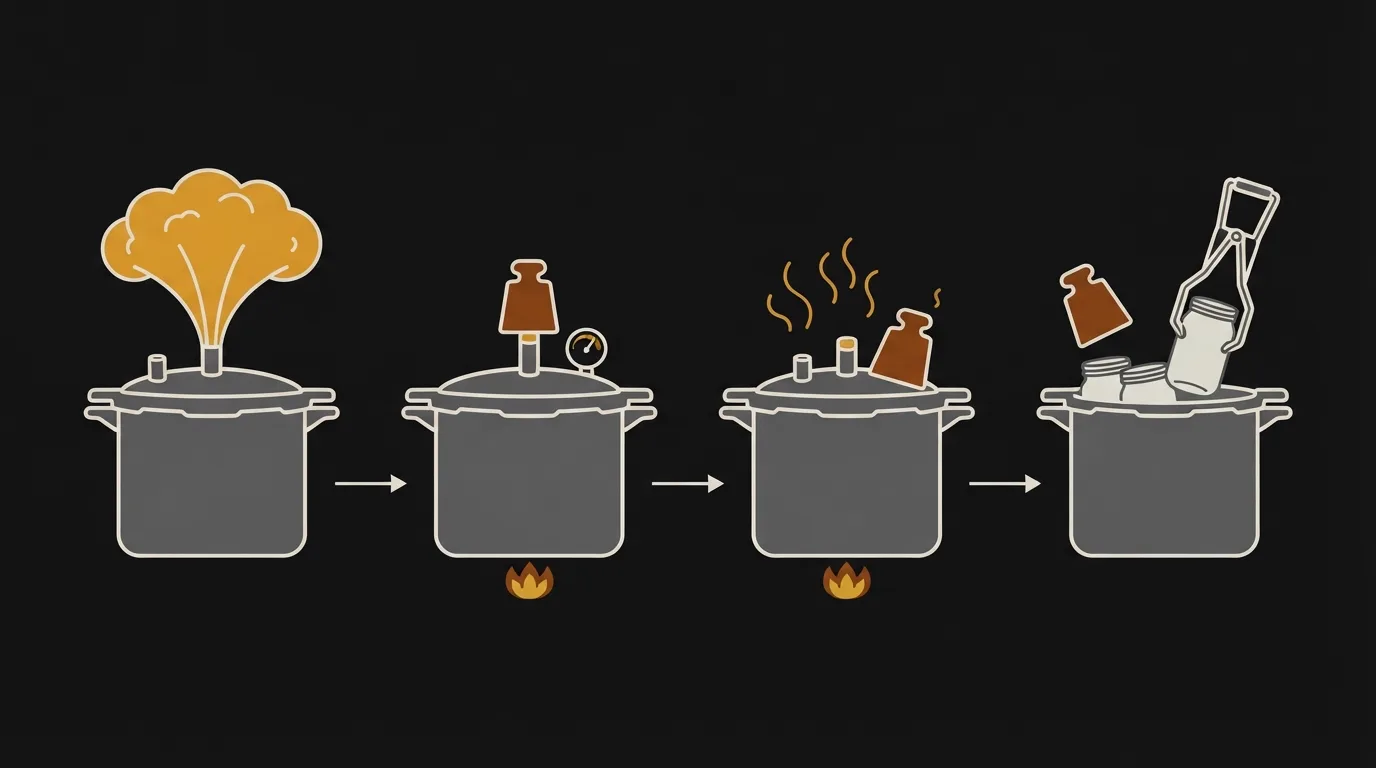
- Vent for 10 minutes. Turn the heat to high. When a steady funnel of steam pours from the vent, start a timer and let it run for a full 10 minutes on high heat. This drives out the air.
- Close the vent and bring it up. Put the weight on or close the petcock. The canner pressurizes over the next 3 to 10 minutes.
- Start timing at pressure. The clock starts when the dial reads the right pressure, or when the weighted gauge begins to jiggle or rock the way its manual describes.
- Hold it steady. Turn the heat down little by little to keep the pressure at or slightly above the target. If it ever drops below, bring it back up and time the whole process again from the start.
- Turn off the heat and wait. Let the canner cool and lose its pressure on its own. When it reads zero, take the weight off or open the petcock, wait 10 minutes more, then unlock the lid and lift it with the far side up so the steam goes away from your face.
A worked example: green beans
Snap beans are the classic first pressure-canning job, and the NCHFP recipe shows how a tested process reads. Wash and trim the beans and leave them whole or snap them into 1-inch pieces. For a hot pack, boil them for 5 minutes and fill the jars loosely. For a raw pack, fill the jars tightly with raw beans. Either way you leave 1 inch of headspace, add a teaspoon of canning salt per quart if you like, and cover the beans with boiling liquid to that same inch.
Pints take 20 minutes and quarts 25. The pressure depends on your canner and your elevation:
| Elevation | Dial | Weighted |
|---|---|---|
| 0–1,000 ft | 11 lb | 10 lb |
| 1,001–2,000 ft | 11 lb | 15 lb |
| 2,001–4,000 ft | 12 lb | 15 lb |
| 4,001–6,000 ft | 13 lb | 15 lb |
| 6,001–8,000 ft | 14 lb | 15 lb |
A bushel of beans weighs about 30 pounds and gives 12 to 20 quarts, so a full canner of seven quarts uses around 14 pounds. NCHFP also states plainly that there is no safe way to process green beans in a boiling-water canner. Other vegetables follow the same pattern with their own times: corn, peas, carrots, potatoes and dry beans each have a page on the NCHFP site, and none of them shares the green bean numbers.
Pressure canner altitude adjustment
Water boils at a lower temperature the higher you live, and the same thing happens inside a canner: at a given pressure, it runs cooler at altitude. Most canning directions are written for 0 to 1,000 feet. Clemson says anyone canning above that has to look up the adjustment for each food and raise the pressure, never the time.
The table above shows why a dial gauge suits mountain canners. At 3,000 feet a dial canner runs green beans at 12 pounds, while a weighted-gauge canner has no setting between 10 and 15, so it runs them at 15. Both are safe. The dial lets you run a little gentler. If you do not know your elevation, NCHFP has a page that helps you find it, and your county extension office will know.
Cooling, sealing and storing the jars
Lift the jars out upright and set them on a towel or a rack, away from drafts, with space between them. Leave them alone for 12 to 24 hours. You will hear lids pop as they seal, which is the vacuum pulling them down as the contents cool.
Then take the bands off and test each lid by pressing the middle. NCHFP says a lid that springs back up when you let go has not sealed. Put those jars in the refrigerator and eat them first.
Wipe the sealed jars, label them with the food and the date, and store them without their bands. A band hides a seal that has let go and can rust onto the jar. NCHFP gives 50 to 70 degrees as the ideal storage range and asks you to use home-canned food within a year for the best quality. A cool basement or a root cellar is a good home for them, on shelves above a damp floor. Our food storage shelf life chart sets home-canned jars beside store cans and sealed staples.
Pressure canning safety: the mistakes that matter
Almost every unsafe jar comes from one of a short list of shortcuts. Each one cuts the heat that reaches the center of the jar, and none of them shows on the shelf.
Skipping or shortening the vent. Air trapped in the canner makes it run cooler than its gauge says. Clemson cites a loss of up to 30 percent of the sterilizing value of a 20-minute process at 10 pounds when the canner is not vented properly.
Letting the pressure dip. A pot that wanders below its target for a few minutes has to start its timing over. This is the rule people most often skip on a long processing time, and it is the one the USDA makes no exception to.
Cooling the canner by force. Running cold water over it, lifting the weight early or opening the vent before it reads zero all cut short the cooling that is counted in the process. NCHFP warns that forced cooling can also spoil food, break seals, drain liquid from jars and warp the lid.
Changing the recipe. Thicker purees, extra starch, flour, bigger jars or a tighter pack than the tested one all slow how fast heat reaches the center. A tested time only covers the food as tested.
Dry canning. Packing raw vegetables without the covering liquid the recipe calls for is a social-media fashion NCHFP has called unsafe. So is heating jars of flour or rice in the oven. Our page on why open-kettle canning is unsafe covers the other inherited methods to drop.
When a jar looks wrong
Throw out any jar with a bulging lid, a seal that has let go, liquid spurting when you open it, foam, mold or an off smell. Clemson's rule is to never taste food from a swollen container or one that smells bad, and to discard any canned food showing a sign of spoilage. Your county extension office can tell you how to get rid of a suspect jar without spreading what is in it.
For jars that look normal but leave you uneasy, Clemson gives a second safeguard. Heat home-canned low-acid food to a rolling boil, then cover it and boil corn, spinach and meats for 20 minutes and every other low-acid food for 10 minutes before tasting. Boiling destroys the toxin. Clemson's own last word on it is better advice: when in doubt, throw it out.
Know the signs too. Botulism attacks the nerves and shows as blurred or double vision, general weakness, poor reflexes and trouble swallowing. It needs hospital care and antitoxin, and Clemson notes that severe cases can need a breathing machine for months. Anyone who shows those signs after eating home-canned food should go to an emergency room and take the jar along.
My take: buy the canner, then learn one food well
I'd buy a weighted-gauge canner if you live below 1,000 feet and a dial-gauge one if you live high up, and either way I'd make the first season about one or two vegetables. Can green beans until venting, holding pressure and cooling feel routine. Then move to dry beans, which turn a sack of shelf-stable beans from our long-term storage guide into ready-to-eat jars, and only then to meat and stock.
In a grid-down winter a shelf of pressure-canned food is what keeps protein on the table after the freezer fails, and it is the method I'd choose before any old curing shortcut. Our guide to preserving meat without refrigeration explains why. Put the NCHFP site in your bookmarks, and print the pages for the foods you can, because the recipes will not load on a screen without power. The rest of our growing and keeping guides are in the homestead section.
Sources
- National Center for Home Food Preservation: Using Pressure Canners
- NCHFP: Beans, Snap and Italian (adapted from the USDA Complete Guide to Home Canning, 2009)
- NCHFP: Cooling Jars and Testing Jar Seals
- NCHFP: Storing Home Canned Foods
- Clemson Cooperative Extension: Canning Vegetables to Prevent Botulism
- NC State Extension: Why Gauge Checks Are Necessary
- CDC review of foodborne botulism in the United States, 1990 to 2000
